ShopDreamUp AI ArtDreamUp
Deviation Actions


Suggested Deviants


Suggested Collections


You Might Like…


Description
EDIT: UGH. I don't even draw or work anything similar to this anymore. For the love of god stop favouriting this. I will update it eventually.
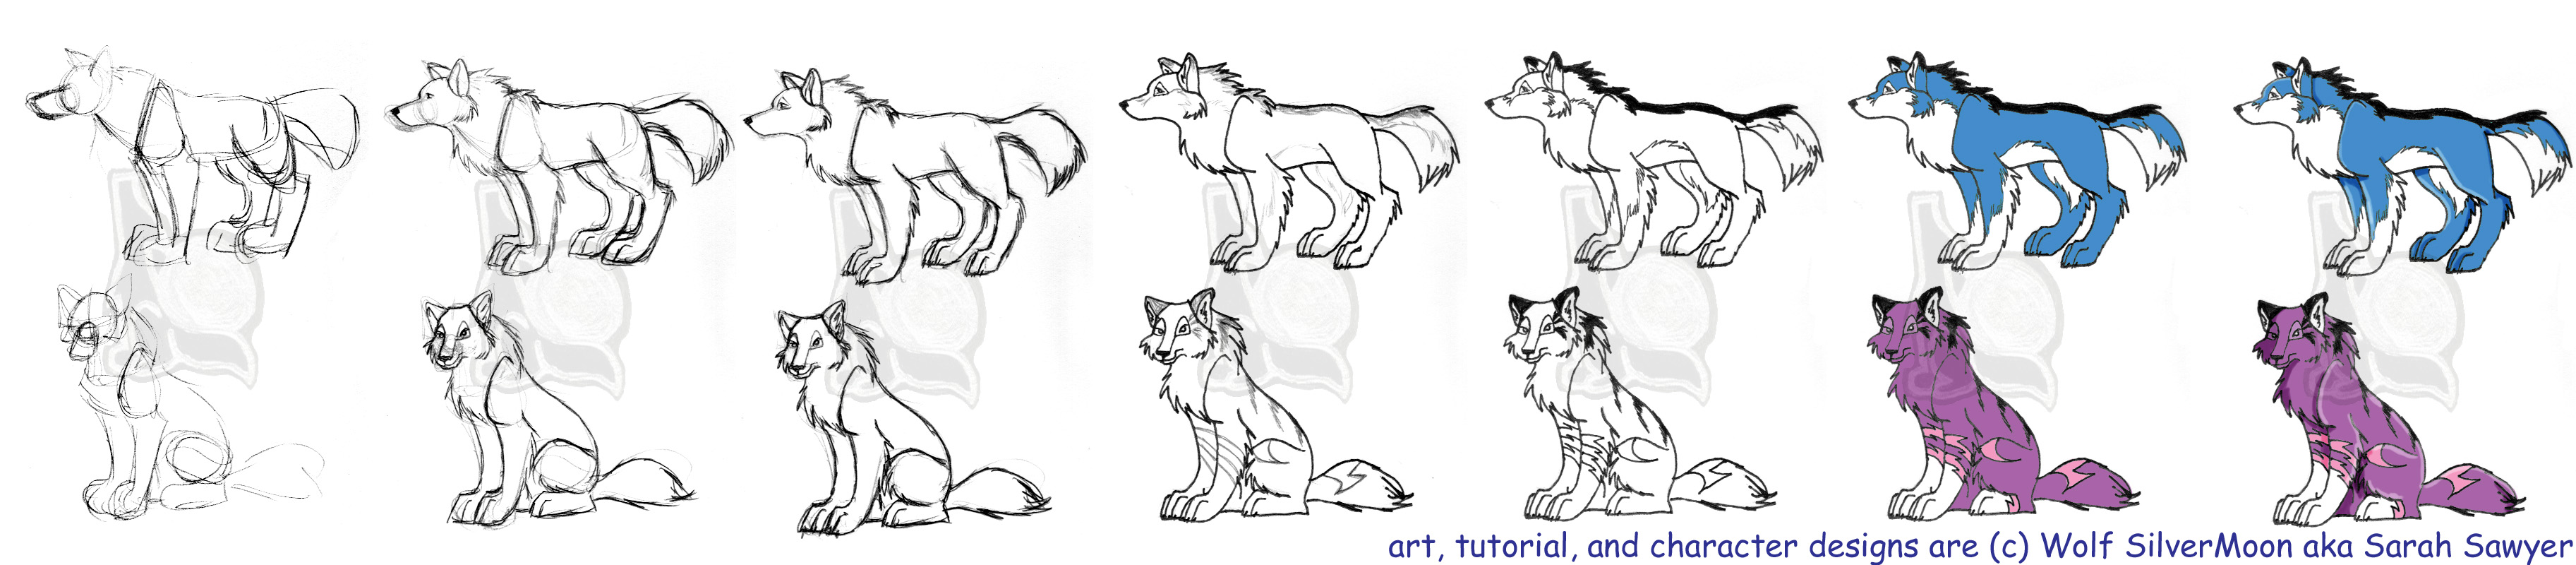
1. Block out the basic form of the wolf. Don't worry too much about anatomy at this point. The major thing I can point out is that the head should always be round and it helps to draw another circle inside the head to indicate where the muzzle will start. This helps you line up where the eyes will go. Use a lot of natural shapes and avoid sharp lines if all possible.
2. Start sketching out the lines. Don't press too hard or make the lines too dark since it's likely you'll erase a lot of them later. Throw in some of the details of the fur and add the eyes. Again, I usually don't pay too much mind to anatomy at this stage. Just get the pose you want. Do not be afraid to erase a lot! Your eraser is your best friend at this stage since you're still feeling out what you want.
3. This is where I start to get detailed and add expressions. I work on anatomy, tweak the paws, and add more fur detail. Expression are really important and bring a lot of life to your character. Make sure to spend special attention to the eyes, ears, and muzzle (the main ways to convey emotion in a wolf who isn't doing much movement-wise). The bottom wolf also started to become more feminine looking since it looked sort of male-ish in previous stages. Really get the details you want done since you're inking next. Do any erasing and changing around if you need to.
4. Ink the picture. At this stage I quite often continue to make last minute changes, usually in the areas of fur, muzzle, eyes, and paws. Here's where I'll sketch in the markings. I don't condone using the markings I used here since... well, if any animal walked around looking like that they'd starve or be eaten... or both.
5. Ink in the markings. Most of the time I only ink in the black and add the other colours on from memory so it looks better (the lines seperating colours bothers me), but for the sake of argument I put them in here.
6. Toss on the desired basic colours in whatever medium you're using. I happen to be using PhotoShop 6.0 here and went a little crazy with the colours. Again, not realistic or appealing to me, but hey, people like funny coloured animals.
7. Lastly, add in brights and darks. Pick a light source if you're in the mood for light to be coming from only one place like in the pictures above. Just from life observations you'll figure out where the shades and highlights should go (if you don't know, take a cloth and scrunch it up and bring a light source in from the same angle you're wanting. you'll figure it out from there). I avoid the one light source thing 'cuz unless a character is getting interregated by some sort of 1930s good cop/bad cop thingy, there's gonna be more than one light source. thus, lots of highlights and shades all over the place. Don't go overboard on either one though or it looks funny. You'll learn how to do these over time from looking at other objects.
Ta-da! All done! if you drew a picture using my instructions, please post it and send me the link! i'd really like to see if I helped (Wink)") overall though, it's better not to try and draw like me. work with photographs for awhile and devlope your own style. hard to get anywhere looking at someone else's drawings.
overall though, it's better not to try and draw like me. work with photographs for awhile and devlope your own style. hard to get anywhere looking at someone else's drawings.
but, this does not mean you can copy my poses or characters or designs! they do belong to me.
1. Block out the basic form of the wolf. Don't worry too much about anatomy at this point. The major thing I can point out is that the head should always be round and it helps to draw another circle inside the head to indicate where the muzzle will start. This helps you line up where the eyes will go. Use a lot of natural shapes and avoid sharp lines if all possible.
2. Start sketching out the lines. Don't press too hard or make the lines too dark since it's likely you'll erase a lot of them later. Throw in some of the details of the fur and add the eyes. Again, I usually don't pay too much mind to anatomy at this stage. Just get the pose you want. Do not be afraid to erase a lot! Your eraser is your best friend at this stage since you're still feeling out what you want.
3. This is where I start to get detailed and add expressions. I work on anatomy, tweak the paws, and add more fur detail. Expression are really important and bring a lot of life to your character. Make sure to spend special attention to the eyes, ears, and muzzle (the main ways to convey emotion in a wolf who isn't doing much movement-wise). The bottom wolf also started to become more feminine looking since it looked sort of male-ish in previous stages. Really get the details you want done since you're inking next. Do any erasing and changing around if you need to.
4. Ink the picture. At this stage I quite often continue to make last minute changes, usually in the areas of fur, muzzle, eyes, and paws. Here's where I'll sketch in the markings. I don't condone using the markings I used here since... well, if any animal walked around looking like that they'd starve or be eaten... or both.
5. Ink in the markings. Most of the time I only ink in the black and add the other colours on from memory so it looks better (the lines seperating colours bothers me), but for the sake of argument I put them in here.
6. Toss on the desired basic colours in whatever medium you're using. I happen to be using PhotoShop 6.0 here and went a little crazy with the colours. Again, not realistic or appealing to me, but hey, people like funny coloured animals.
7. Lastly, add in brights and darks. Pick a light source if you're in the mood for light to be coming from only one place like in the pictures above. Just from life observations you'll figure out where the shades and highlights should go (if you don't know, take a cloth and scrunch it up and bring a light source in from the same angle you're wanting. you'll figure it out from there). I avoid the one light source thing 'cuz unless a character is getting interregated by some sort of 1930s good cop/bad cop thingy, there's gonna be more than one light source. thus, lots of highlights and shades all over the place. Don't go overboard on either one though or it looks funny. You'll learn how to do these over time from looking at other objects.
Ta-da! All done! if you drew a picture using my instructions, please post it and send me the link! i'd really like to see if I helped
but, this does not mean you can copy my poses or characters or designs! they do belong to me.
Image size
3650x800px 613.44 KB
© 2004 - 2024 wolfsilvermoon
Comments24
Join the community to add your comment. Already a deviant? Log In
You explained this all so well, well done ")